Showing posts with label DIY. Show all posts

March 6, 2014

DIY: Wedding Invitations

Most soon-to-wed couples tend to DIY their wedding invitations, and Mox and I were no exception. We plan to create our own invitation just so we can save on printing costs. Most invitation suppliers have a minimum requirement for their printing—about 50 to 100 pieces—and I don't think we would need that many invites. Gastos na nga sa papel, gastos pa sa pera. Plus, we want to put our own spin on our invite to make sure it reflects our theme, so DIY was the only way to go. :)

Since Mox is the Photoshop expert, we decided that he would be the one in charge of all our stationery needs. Since our wedding theme is summer/beach, we wanted our invites to be colorful and fun! No fancy embossings or formal calligraphy please. 

Our wedding invite is a single-fold card printed back-to-back. The main invitation details and other wedding info were on the front and back pages, respectively, while the entourage page was printed on the inside. Mox also decided to do avatars for each entourage member, which was a cute touch. Hehe.


Then we printed our map insert on a single page.


Our invites were larger than the usual invitations so we had a difficult time searching for the right envelope. Then I found brown 6x9 catalog envelopes. The size was perfect, and the envelopes were inexpensive too! It was a win-win buy. :) But I suggest that you find the perfect envelope first, then adjust your layout based on the envelope size, instead of the other way around. Mox didn't want to adjust his layout so we had to look for an envelope that would fit an 8x13 card folded into half. It was a bit of a challenge, so please do not follow us. Haha!

We were inspired by Aweng and Thessa's wedding invitation, so we decided to do ours just like them. We printed our monogram on sticker paper, created some tags then decided to tie our invites together with some jute strings. I heard that you can buy four rolls of jute strings at Japan Home Center for only P66, but luckily, I found one roll among the art supplies of my brother, so I didn't have to buy one. Yey, bawas gastos ulit!

Time to put things together
Here are our finished invites! :)

Ready for distribution
Here is the breakdown of all the materials that we used for our invitation.


We spent less than P2,000 for 40 invites, which means that the cost per invite falls at only P46! Not bad right? We spent a lot on printer ink because our invites are fully colored, but at least we can still use the leftover ink to print other stationeries like our missalette covers, table numbers, etc.

I am so proud of Mox because he was in charge of everything! He did the layout, printed the invites and cut them out himself! Good job baby. :)

Now, let's hope all our invited guests would RSVP before the deadline! Cross your fingers guys.
Photobucket

December 29, 2012

DIY: Wedding Cord

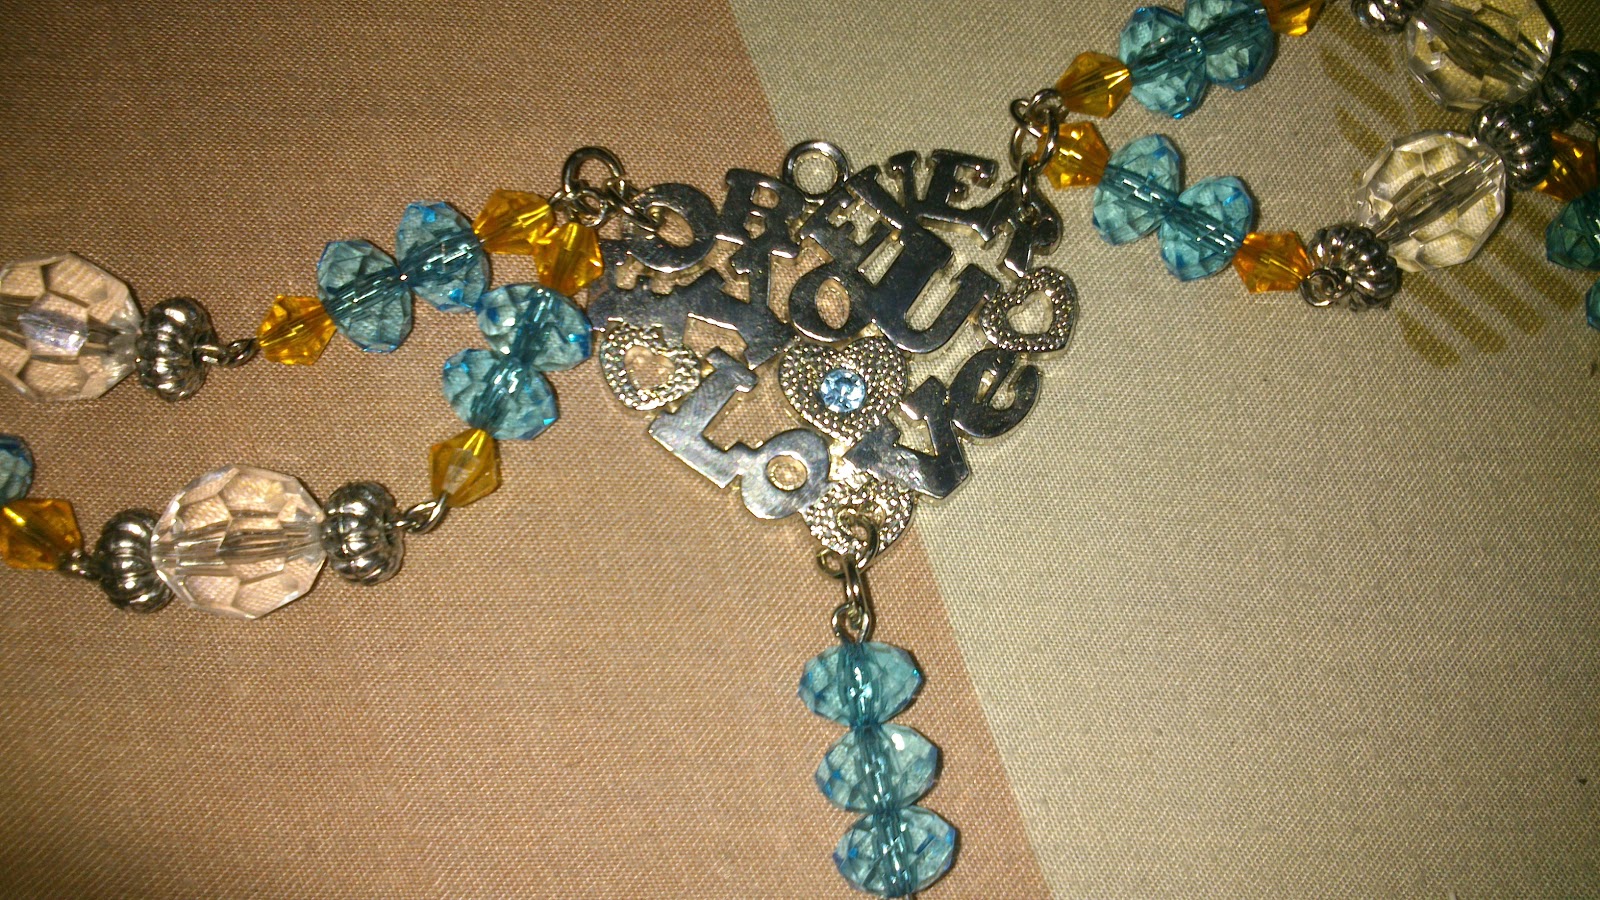
After two days of cutting wires, stringing beads and creating loops, I have finally made our wedding cord. Grabe lang, ang sakit pala nito sa kamay. But after seeing the finished product, it was all worth it. :)

For our cord, I used turquoise, orange and white acrylic beads, all in different shapes and sizes. I also bought silver spacers (if that is the correct term) to add more texture to the cord. And of course, let's not forget the eyepins and the jumprings to connect all the beads.

Just a tip, if you're going to go to Wellmanson to buy all your materials, make sure to visualize your cord's design so that you would have an idea what materials to used and what beads to buy. I was so overwhelmed by the choices in Wellmanson that I just grabbed whatever eyepins and beads that I could find. Then when I had finally decided on a pattern, I found out that the eyepins that I got were too short for my chosen design. I had to go back to Wellmanson's to buy longer eyepins. Pfft. Sobrang hassle.

Anyway, here is the result of my hard work and creativity. Pwede na pala akong maging DIY queen. (Feelingeran lang noh? Haha.)


I didn't want to use the usual medallion that would connect the loops so I decided to look for a cute little brooch as an alternative. However, I couldn't find the right brooch that could hold all strings together. There was actually one heart brooch, but I thought it was too bulky and a bit expensive at P50 a piece. So I just bought a pair of his-and-hers keychains and decided to use one of them as a connector. The keychain was actually the perfect choice because it has holes where I could put the jumprings used to connect the loops. Plus, the crystal on its center matches our motif perfectly. Oh diba, meant to be.

To see the step-by-step process in making this cord, just visit Tine's blog. She gives much clearer instructions than I do, so you wouldn't have a hard time making your own cord. Take it from me, I just followed the tutorial that she did to make mine. Hehe. :)

Photobucket

Beads Galore

Since we have a five-day vacation (hurray for Sunday holidays!), I finally have the time to start my next DIY project: our wedding cord! :)

A few weeks ago, I went to Quiapo to buy all the materials we needed:


So now, all I have to do is to use my limited DIY skills and try to make a decent wedding cord. Good luck na lang sa akin. Haha. Will update you on this project soon! :)


Photobucket

August 27, 2012

DIY: Felt Pomanders

Finally, after more than a week of cutting, rolling and gluing felt flowers into a 7" styro ball, I finally finished one pomander ball for my maid of honor. Believe me, this really is a labor of love because I sustained a lot of burns while doing this project, including a serious one when I dropped a felt flower filled with hot glue on my inner thigh. Major OUCH Moment!

Anyway, for starters, here are the materials that I used:
  • Styro Ball (I used the 7" kind)
  • Felt Cloth (1 yard of orange felt and 1 yard of yellow felt)
  • Scissors
  • Glue Gun (and lots and lots of glue sticks!)

First, I cut both felt cloths into strips that are about a 12" long and 2" wide.


Then I folded each strip into half and glued them together.


Then I cut little slits into the folder part of the felt. You can be creative with how you cut your felt as this will give you variations to your flower. For example, you can do a straight cut but with narrower slits to make it look fluffier, or you can even do diagonal cuts. I did wide, straight slits because I was too lazy to cut tiny slits on the felt. Plus, my hand hurt too much because of all that cutting. Haha.


I rolled the felt cloth up while securing it with glue along the way. I then fluffed it in place so that it would resemble a mum.


Afterwards, I glued the felt flowers in a straight line around the styro ball.


I then glued more felt flowers on the opposite direction, creating four equal sections on the ball.


I filled up the sections with the remaining felt flowers, glued a white satin ribbon on the top and VIOLA! I now have an orange and yellow felt pomander.


A word of warning though: be cautious when choosing the size of your styro ball. Adding flowers to the ball makes it larger than it really is, so I think a 4" to 5" ball would be enough for handheld pomanders. I didn't know this at first, so I bought the largest styro ball in National, which is the 7". My pomander soon became the size of a volleyball. Oh well, it looked okay naman so I guess I'd stick to this size. Besides, I already bought four of these balls so I have no choice but to use them all. Haha.


August 25, 2012

DIY Sneak Peek: Felt Mums

Hello friends, I'm sorry for not writing for about a week now. I was able to buy some materials for my DIY flowers, so right now, I've been busy unleashing what little creativity that I have to put all these DIY creations together. First on my list: pomander balls for my bridesmaids/secondary sponsors and maid of honor.

Here is a sneak peek of the felt mums that I will use for the balls. :) It took me hours, and a few burnt and sore fingers, just to create that bunch.


Anyway, I'll post the finished product once I'm done. Wish me luck on this project! :)


August 14, 2012

DIY: M & N Decoupages

Due to the two-day work suspension caused by the monsoon rains last week (and the fact that I was bored out of my mind), I was finally able to begin one of my DIY projects—paper mache decoupages of our initials—which we will use as props for our freenup this Saturday. I was supposed to make a paper mache heart as well, but since this was a spur-of-the-moment thing, I only had time to make the initials. Oh well, I will probably make the heart afterwards so that we can use all three decoupages as decors for the registration area of our reception venue.

First things first, I needed boxes to make the letters. Luckily I was able to find two large cereal boxes in our kitchen cupboard. They’re the perfect size for my decoupages.

Old cereal boxes
I traced the letters on the boxes and then cut them out. Since I’m a DIY beginner, I chose a font that is big and rounded so that it would be easier to cut and form into 3D letters. Of course, those with better arts-and-crafts experience than me can experiment with fancier fonts.

After more than 3 hours of cutting and taping the boxes, and with a few injuries (I scraped my knuckles on the blade of the tape dispenser), I finally have my cardboard 3D letters. Don’t be scared to use lots of tape to make the letters as this will make them sturdy. I practically used up one roll of scotch tape, which made my dad mad. Nagsasayang lang daw kasi ako ng tape. Haha.

3 hours of cutting and taping = 3D letters
Now it's time to make the paper mache! First, I mixed flour, water and a pinch of salt in one bowl until the batter was smooth and had no lumps. Then I tore strips of newspaper. I brushed the box with the paste, then pasted (wow, redundancy at its best) the newspaper strips onto the box, then brushed it again with the paste to ensure that the strips would stick to the box. Make sure to check the nooks and crannies of each letter to see if there are still parts that are uncovered.

Medyo messy lang. x_x
Let it dry completely then paste another layer of newspaper. I had to let each layer dry overnight since I only had limited time to work on it at night, but it would usually take a couple of hours or so to dry.

Paper mache-ing done!
Since I didn't have time to wrap the letters in nice giftwrappers (plus, I'm scared that' I'd just ruin the whole thing), I painted my letters turquoise. There are a few bumps and lumps due to the newspapers, but I liked it because it gives the letters character. I also decorated the letters with orange felt flowers. See, they even fit our color motif! :)

Finished product!


There, I hope my M & N decoupages passed your DIY standards. For a more detailed explanation (if mine wasn't clear enough, hehe.), you may check out this tutorial. :)


May 11, 2012

DIY: Wedding Monogram

I spent the whole day practicing my DIY skills for our wedding. This time, I attempted to make our wedding monogram using Photoshop. Since the only designing tool that I use is Paint (and that is to just crop my face out of bad pictures), I had to search for tutorials for Photoshop newbies like me. Then I spent the rest of the day trying to make sense of the different tools and functions of the software. I now have more respect for the graphic artists and designers out there. Nakakahilo ang Photoshop, promise.

Good thing I found this blog that helped me through the process in creating our monogram:. Wedding Monograms Tutorials. There are various tutorials here that can help DIY brides create different styles for their monograms to suit their theme or motif.

After spending the day tinkering with Photoshop, here is what I came up with:

I don't know if this will make the cut for our wedding monogram, but hey, I'm still proud of my little creation. I may be tooting my own horn a bit, but I think it's beautiful. Pagbigyan na, first time makagawa ng ganito eh. And in Photoshop too!

But I never thought making this baby can be so time-consuming. Maybe I should just leave all the monogram-designing and invitation-layouting to Mox. After all, he is the expert.


April 28, 2012

My First DIY Attempt

I am not an artsy person. I couldn't draw to save a life and I couldn't make some crafts out of recycled materials. But I still plan to do some DIYs for our wedding to save a few thousand bucks on our wedding expenses. Ambisyosang frog diba? Haha! I  already made a list for our DIYs, which includes my entourage's flowers and even the reception decor. Hay, good luck na lang sa akin. I've been researching nonstop for tutorials, but I'm still not confident that I could pull off my DIY dreams for our wedding. I definitely need all the help I could get, so as early as now, I am already practicing on my DIY skills.

For starters, I  tried to make a simple fabric flower, which will be used for the entourage's bouquets. Since this is my first attempt, I used an old piece of curtain for the flower, but I will use felt fabric for the real bouquets.

After a few burns from the glue gun, I finally finished my fabric flower:

Don't mind the band-aid. :P
There are different ways on how to make a fabric flower, but this is probably the easiest way to do it. I'll post some tutorials once I begin making my entourage's bouquets for real. Practice run lang ito. Hehe.

I thought of attaching the flower to a headband, which could be used as an accessory for the flower girl. I got my old headband and covered it with a strip of cloth so it would be the same color as the flower. The edges were a bit frayed because I used crappy scissors, but at least it added character to the headband. Hehe.

 
Here's my cousin, who will be my flower girl for the wedding, wearing my DIY headband.


I think my first DIY attempt is a success, but I still need to practice more, especially since I plan to make more complicated accessories (but that is a secret for now). Oh well, at least I still have two years to improve on my skills. Malay mo pagkatapos nito, magiging DIY queen na ako. Haha! Asa.


LinkWithin

Related Posts Plugin for WordPress, Blogger...